I've made the leap. I'm transferring this blog over to wordpress. I've been debating this for a while. I also changed my name - same me, same food obsession, just a different setting! I'm still learning the wordpress ropes and updating some of my links so bear with me! Hope to see you there!
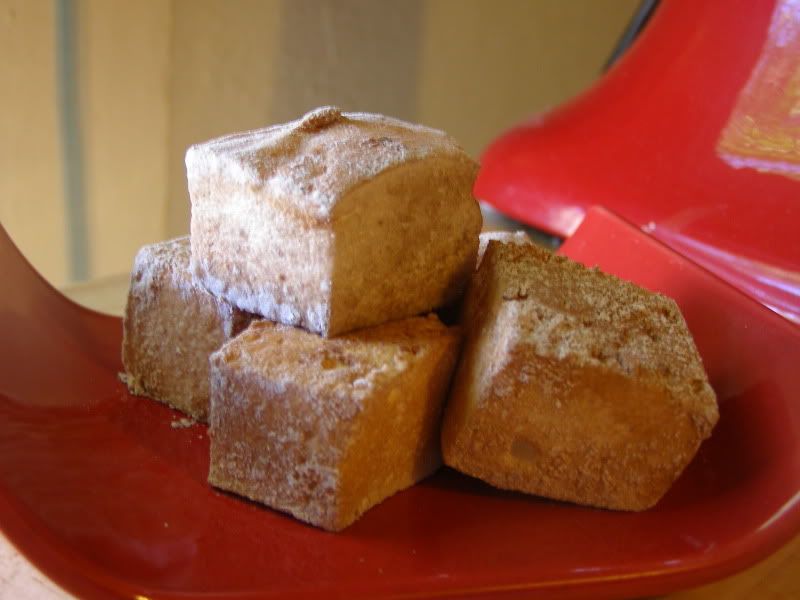
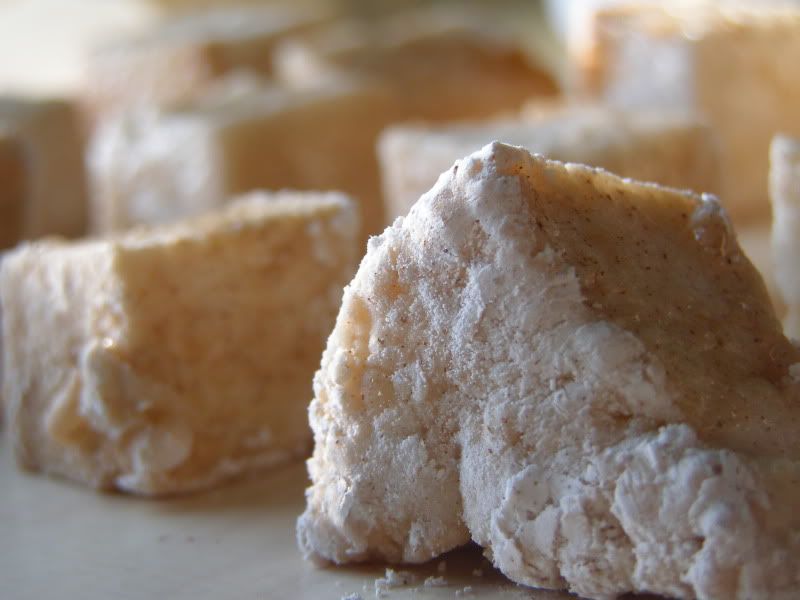
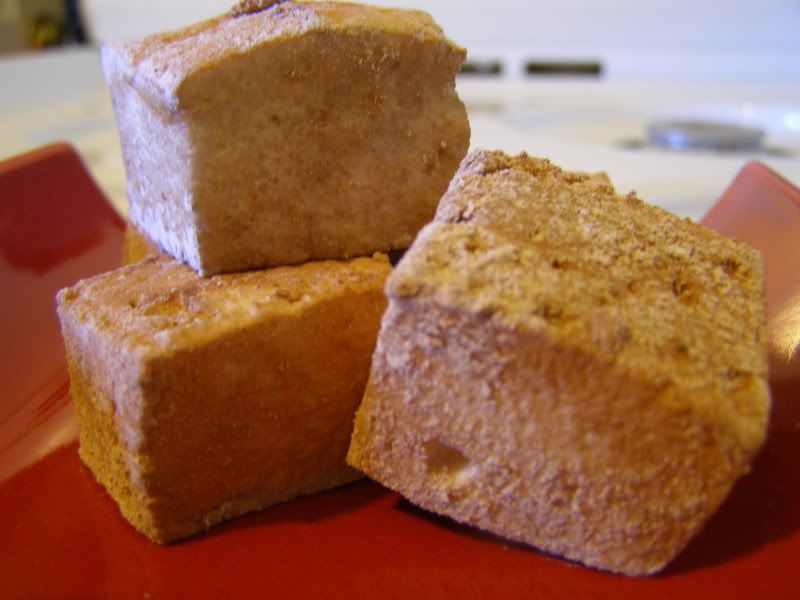
Peanut Butter and Ginger
Thursday, August 12, 2010
Tuesday, August 10, 2010
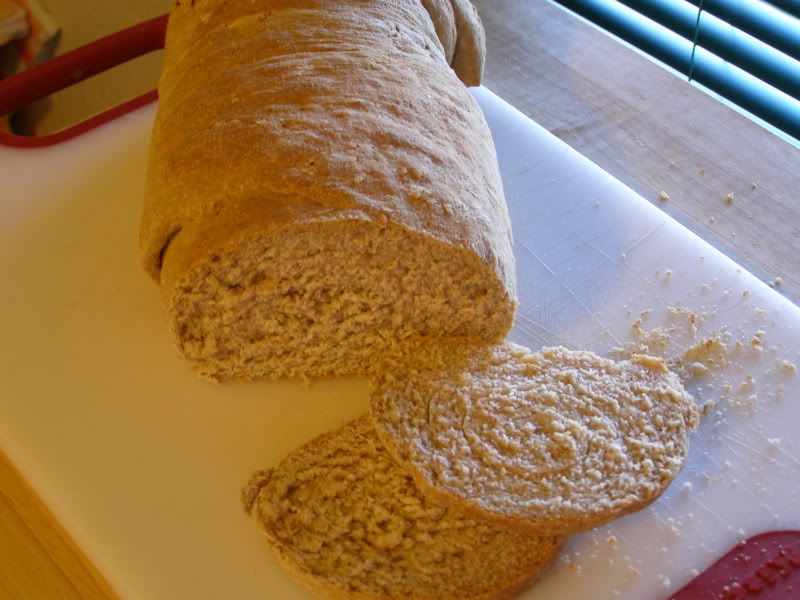
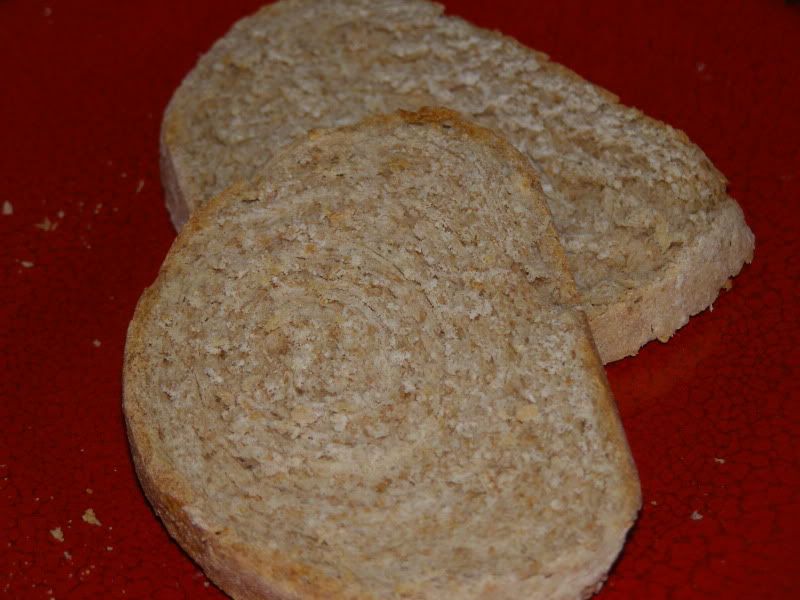
Chocolate Pane Francese
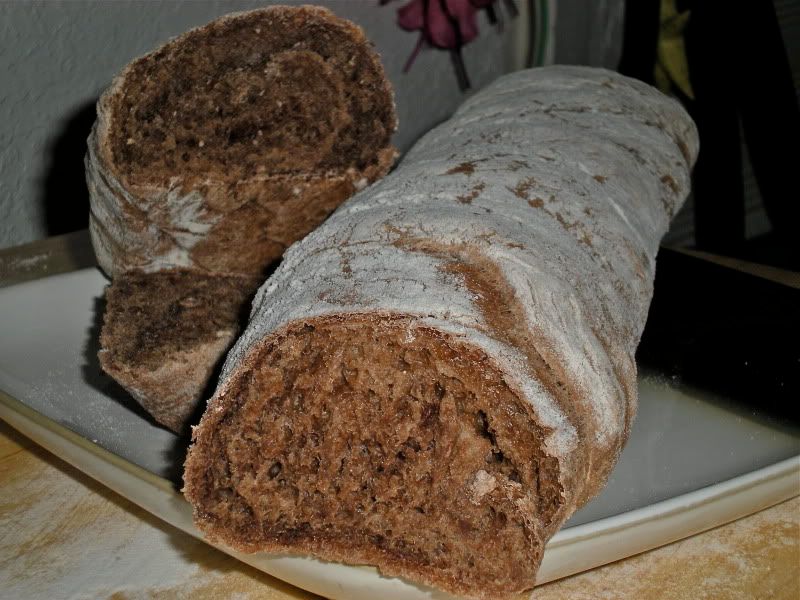
Yesterday during some downtime at work I stumbled across a recipe for a heavenly treat. It was over at Chocolate and Zucchini, but, though it looked so deliciously decadent, a sourdough starter is a teensy bit out of my comfort zone. However I was not to be deterred! Armed with this awesome bread idea, I turned to that bread baking cookbook my mom gave me to suit my novice bread making skills!
I took the Pane Francese recipe and altered it a bit to include the ingredient of the hour! Since I had never made such a bread before, I went light on the cocoa powder and added in some chopped up bittersweet chocolate.
We were having issues with our internet service so we had to wait around all day for the company to come out and reattach the apartment to the telephone line... Then we had to reset the router... Only the determined bread maker can maneuver around the modem and router that have taken up a temporary residence under my mixing cart!

Haha!
Let me say this: the bread smelled utterly amazing while it was baking. Kyle and I were chomping at the bit to try it. Normally I can control myself and at least wait until the next morning to slice into a loaf - but not this bad boy! It made it about 5 minutes before the knife came out and the beautiful crust was broken.
Oh. My. God.
This bread was heavenly. Chocolatey but not sweet, crusty on the outside and soft on the inside. Wow. Perfection in loaf form.
This is going to be a staple in my house for sure.
Chocolate Pane Francese
1 package active dry yeast
1/4 cup warm water
3 cups all purpose flour
2 tablespoons cocoa powder
1 teaspoon turbinado sugar
1/2 teaspoon kosher salt
3/4 cup ice cold water
1/4 cup skim milk
1 ounce bittersweet chocolate, roughly chopped
In a small bowl, sprinkle yeast over warm water, mix with fingers and let stand until foamy. In stand mixer, using hook attachment, combine flour, cocoa, sugar and salt. Add yeast mixture, milk and water then beat on medium speed until well blended, adding bittersweet chocolate about halfway through. On low speed, beat the dough until elastic and shiny, adding flour by teaspoons if the dough is too sticky. The dough should be sticky, but touchable.
Cover bowl with plastic wrap, a towel or the lid to a large bowl (as long as the dough can breathe it's all good) and set in a warm place to rise until doubled in size, about 1 1/2 hours.
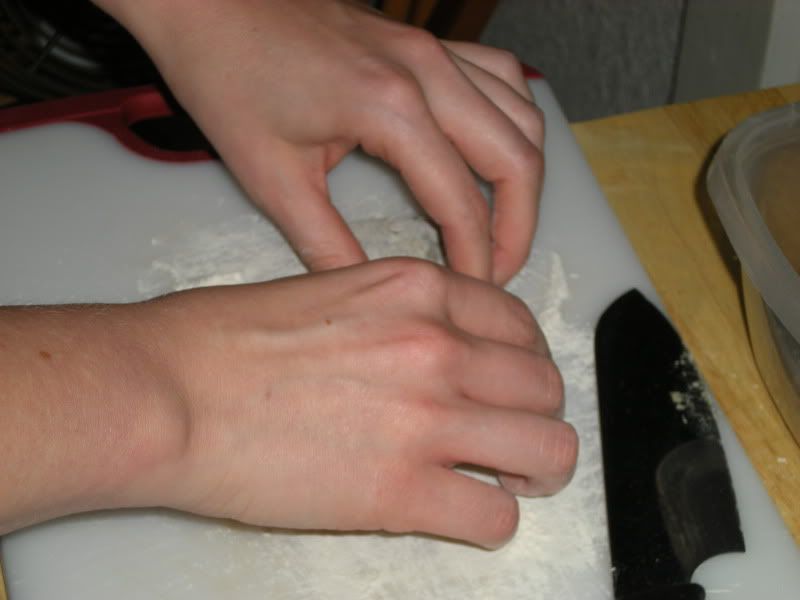
Sprinkle dough with flour and turn out onto a well floured surface. Knead by hand for a few minutes to incorporate the flour and make the dough easier to work with. Cut the dough in half and roll each half into long rectangles. Starting at the short side roll dough tightly, pressing down each seam as you roll. They will be long loaves, so don't worry!
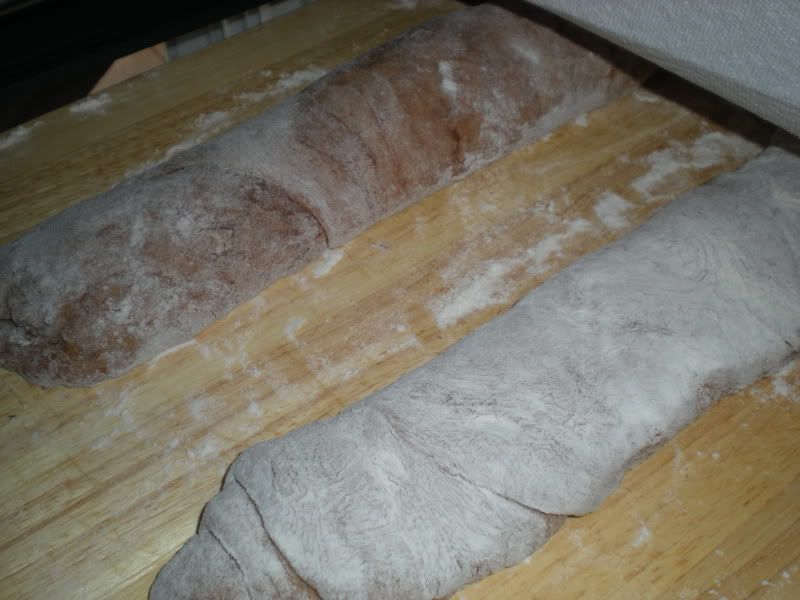
Cover lightly and allow loaves to rise for 30 minutes.
Preheat oven to 475. Transfer loaves to greased cookie sheet (or sheets in my case since my oven is so tiny). Set aside for 15 minutes to allow them to get slightly puffy.
Place bread in the oven and reduce heat to 425. Bake 20 minutes or until crust is nice and crispy feeling. Turn off the oven, crack the door and allow bread to sit in the cooling oven for 5-10 minutes. Remove from oven and immediately transfer to a cooling rack. Then DIG IN!
Basilicious
Mmm... summer. One of the best things about summer is the availability of all the fantastic fresh herbs everyone seems to grow! Amanda's parents have mint in their yard, Annie's parents have jalapenos (ok not really an herb but delicious all the same) and someone happened to bring in some freshly picked basil to Annie the other day. Thankfully she was willing to share!
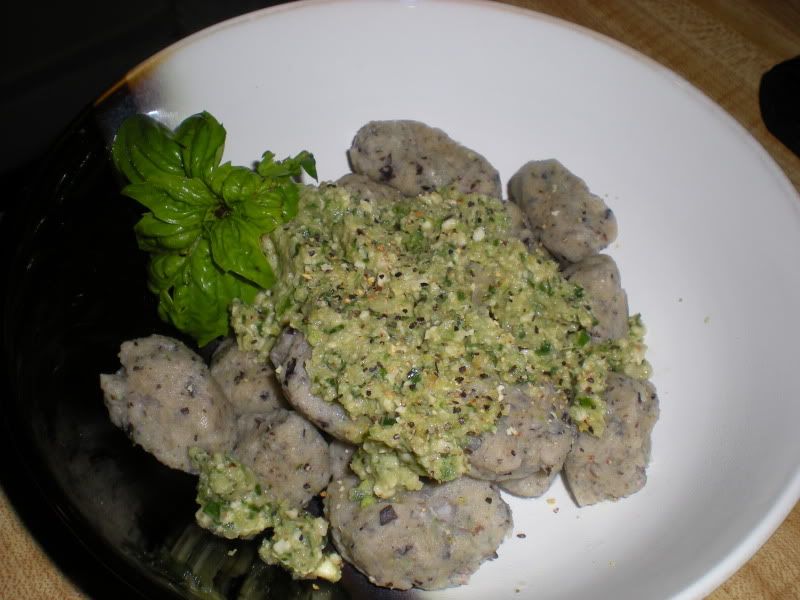
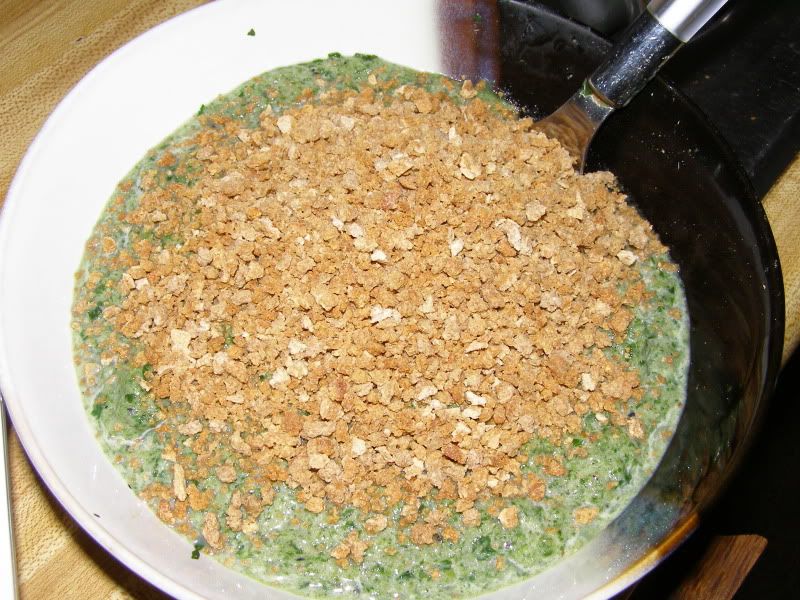
Inspired by this awesome surprise and the tofu gnocchi I had already tried from Peas and Thank You, I decided to whip up a batch of what I like to call Black Bean and Basil Dumplings. I was much too lazy to wait for the dough to get cold enough to roll into snakesand cut into tiny pieces. I was just patient enough to let the dough cool its heels in the freezer for about 20 minutes. They were just hard enough to stand up to boiling by then, so I just kinda rolled them into rustic balls and squashed them a bit.
I boiled them in a pot of slightly salted water and covered them with a Cucumber Basil Pesto-type sauce. They came out pretty damn tasty! And they were mega satisfying! I will definitely be making these again and trying out different types of beans.
Kyle just brought me Cranberry Beans. He also restocked my adzuki beans supply. Maybe I can do an adzuki bean gnocci with a Japanese flavored pesto... we'll see where the summer winds blow me!
Black Bean and Basil Dumplings
1/2 cup black beans
1/3 cup cannellini beans
1 large clove garlic
1/2 large jalapeno, seeded
1/3 cup fresh basil
1 egg
1/3 cup all purpose flour
1/2 cup brown rice flour (you could use a different flour here)
1 tablespoon apple cider vinegar
1 tablespoon water
Salt and Pepper, to taste
In a food processor, combine beans, garlic, jalapeno, basil and egg until well combined. Add in flours and give it a whirl again. Add vinegar, water, salt and pepper and process until a dough begins to form. Transfer into a container and place in the freezer for at least 20 minutes or until firm enough to handle.
Break apart pieces of dough, rolling them lightly in flour until you form a bunch of tiny dumplings, or large dumplings if you prefer. Bring a pot of water to a boil. Add salt, then place about 1/3 of the dumplings in at a time, boiling until they float for 2 minutes. Serve plain, with a sauce or even just melted butter!
I opted to serve these with a delicious "pesto" I made. In it was:
- a whole cucumber
- half a jalapeno, seeded
- 2 ounces asiago cheese
- 1/4 cup toasted walnuts
- a dash of lemon pepper
- a palm full of basil leaves
- 2 tablespoons olive oil
Mmm... YUM!
Sunday, August 8, 2010
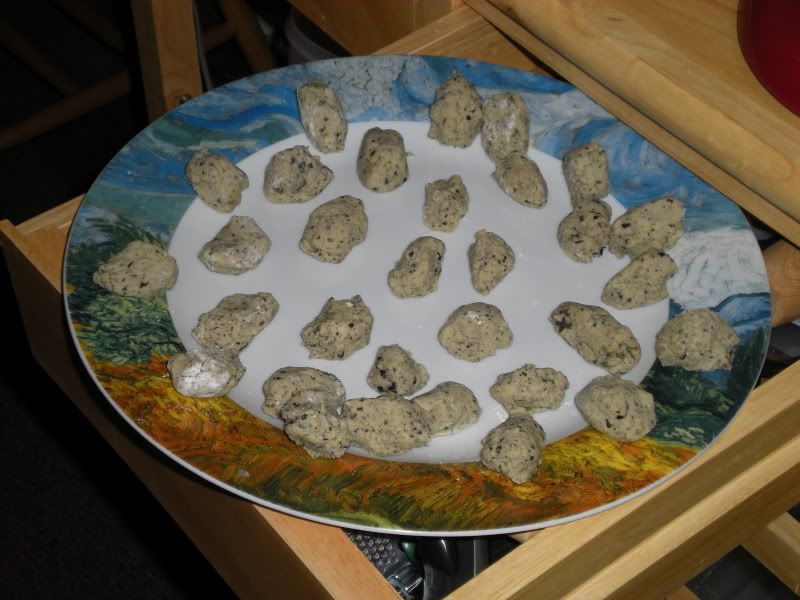
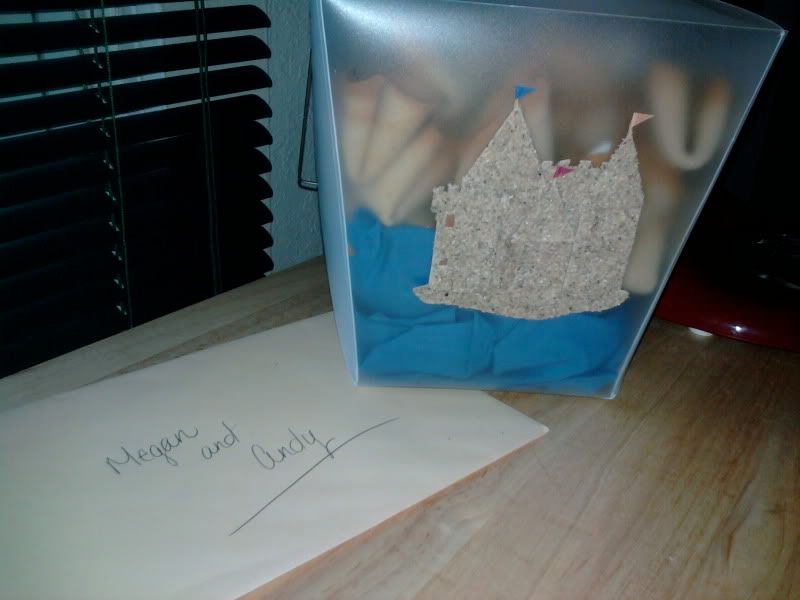
Good Fortune
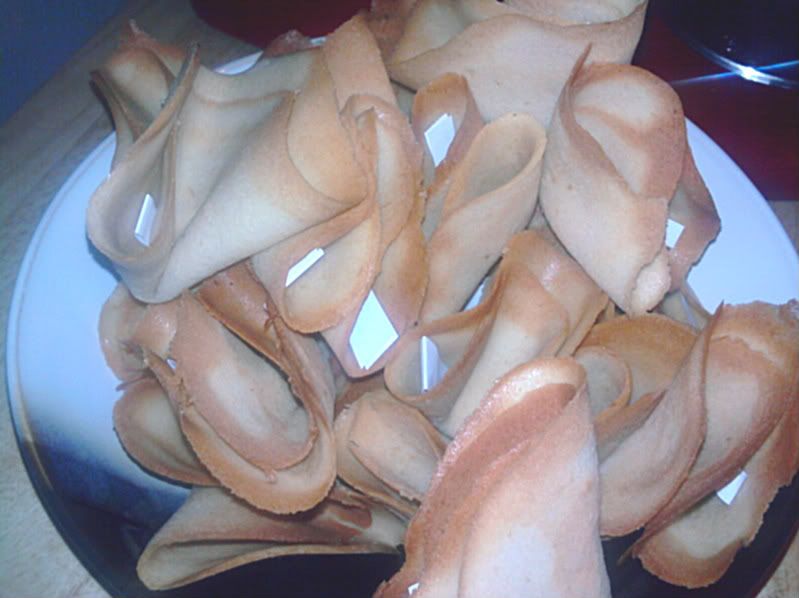
Happy Wedding Season! It seems like everyone chooses to get married at this time of year. You know what I mean, the ungodly hot, sticky, melt into a puddle season. Fortunately for my coworker Megan, her wedding day was a cool mid-80's day! She looked so happy and so pretty! Here's the gang from the bank!

I wanted to do something unique and nontraditional for a wedding present. I get really bored giving the same things all the time or writing out a check. I racked my brain for a few days trying to figure out what on earth I could do!
Then it hit me! I could make personalized fortune cookies! With Friends quotes inside! Megan loves Friends (well, who doesn't really?) and I figured she and the hubby could curl up on the couch and watch a few episodes while chowing the cookies! Unfortunately it didn't really hit me that they were going on their honeymoon the NEXT day and therefore wouldn't eat the cookies for a week. Oops! I hope they held up!
**They held up great! A little on the softer side, but the flavor was still awesome! After Megan figured out what was inside she was so excited! Hooray for personalized gift-giving!**
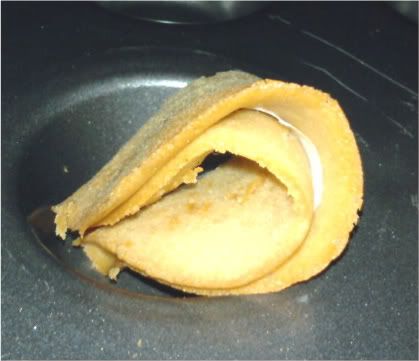
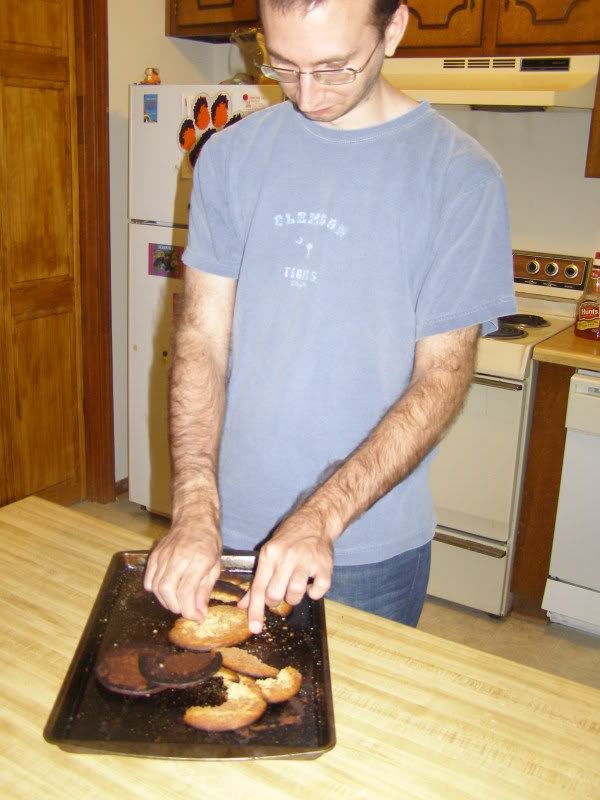
I searched online and found a great recipe on allrecipes.com. I set to work with a practice batch a few nights before the event. They were tasty little doodads! After a few batches I figured out I had been making them too thick, which explained why they kept cracking in the middle when I folded them. Once I got the consistency right these were super simple to make, though a tad time consuming. I only made 2 cookies at a time in the oven since they cool so quickly.
They were a HUGE hit at work! Everyone I offered them to was impressed and took one!They sound intimidating, but they're easy as pie! Well.. easier than pie I think. I haven't really tackled that milestone yet. But don't be scared of these cookies, try them for yourself and learn how to impress your coworkers with your baking prowess!
Fortune Cookies
2 egg whites
1/2 cup turbinado sugar
1/3 cup butter, melted and cooled
1/8 teaspoon vanilla extract
1/8 teaspoon almond extract
2/3 cup all purpose flour
1 tablespoon plus 1 teaspoon water
Preheat oven to 375. Grease a cookie sheet and have fortunes all printed or written out, cut up and ready to go. Using whisk attachment on standing mixer, whip egg whites and sugar on high speed until frothy. Reduce speed to low and add in butter, extracts, water and flour, mixing well after each addition. Consistency should resemble something like a thin pancake batter. Spoon the batter into roughly 3-inch circles onto prepared cookie sheet. I found that the thinner the circles were, the less likely the cookies were to crack when folded. That seems to be the most important part of the whole process. That and working quickly...
Bake the cookies 5-7 minutes or until the edges begin to brown slightly. Remove from oven, loosen cookie from the sheet with a thin spatula, place message in the center and fold in half. Fold the ends of the half together into a horse shoe and set in a muffin tin to allow cookies to cool and keep their shape. Repeat until all the batter is gone!
Saturday, August 7, 2010
Bread Mania
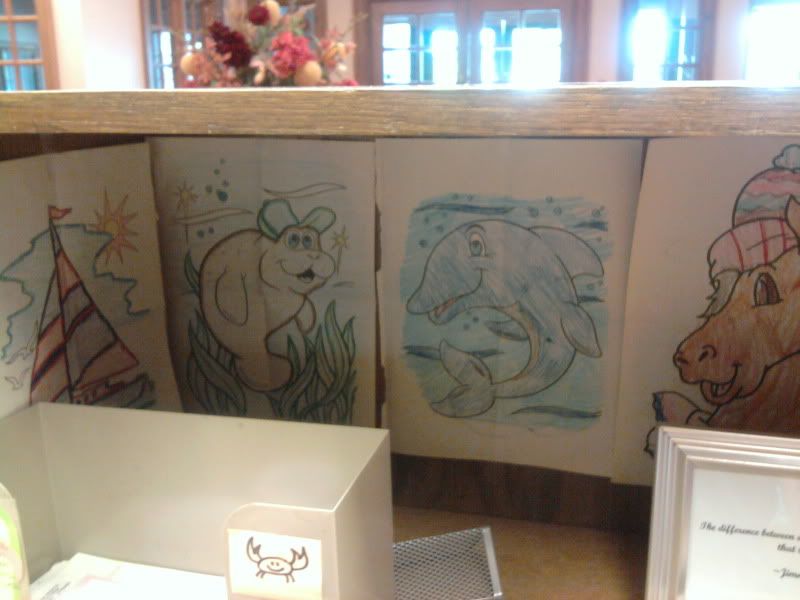
Like I mentioned earlier, it has been a BUSY month. My 27th birthday was a few weeks ago and my adorable cousins came in from out of town to surprise me at the bank!

They colored pictures, which I hung up by my computer.
They spent all afternoon baking cupcakes and brownies, which they decorated with fresh fruit, frosting and dark chocolate they shaved themselves! Mom and Grandma helped a little, of course!


And shared lots and lots of hugs!

We all went out to dinner that night, the girls, Mom, Dad and Grandma!


The girls spent the night with me, sleeping over in my itty bitty apartment. I forgot how much fun sleepovers were! We ate spaghetti (with my Grandma's delicious sauce), painted our fingernails and toenails (with only minor spillage), and walked to Dairy Queen for some much needed deliciousness!
The next night was spent at my mom's with pizzas on the grill along with spaghetti pie for dinner. The girls also put on a talent show they had been rehearsing for 3 nights!
It was a fantastic surprise brilliantly organized by my Mom, Grandma and Aunt. It was the best birthdays I've had in a long, long time!
I love you guys!
That weekend my mom gave me one of her old bread making books. Since then I've been trying my hand at breads, which is why I haven't been posting too many recipes. I still don't have a recipe today; the rye bread I made that was so delicious was just too crumbly.
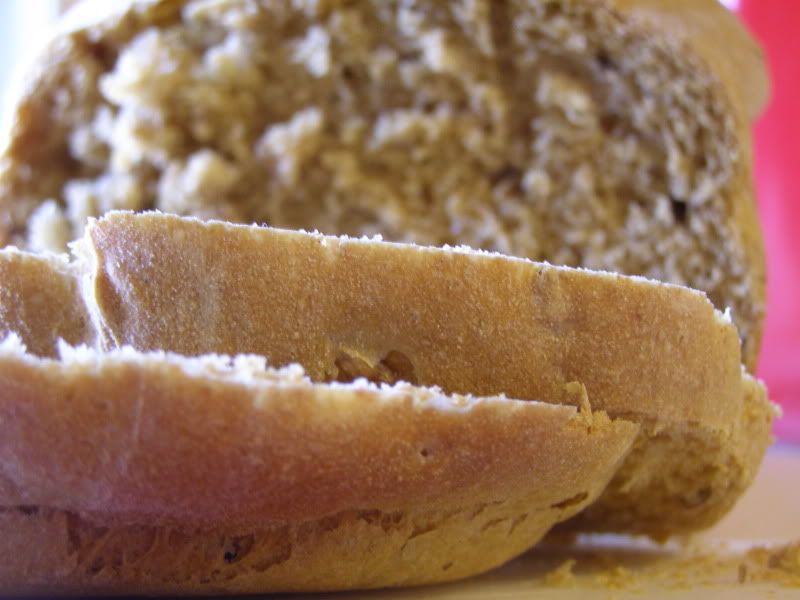
Something I need to work on. It toasts up wonderfully, but it's a bit dangerous to grab out of the toaster!
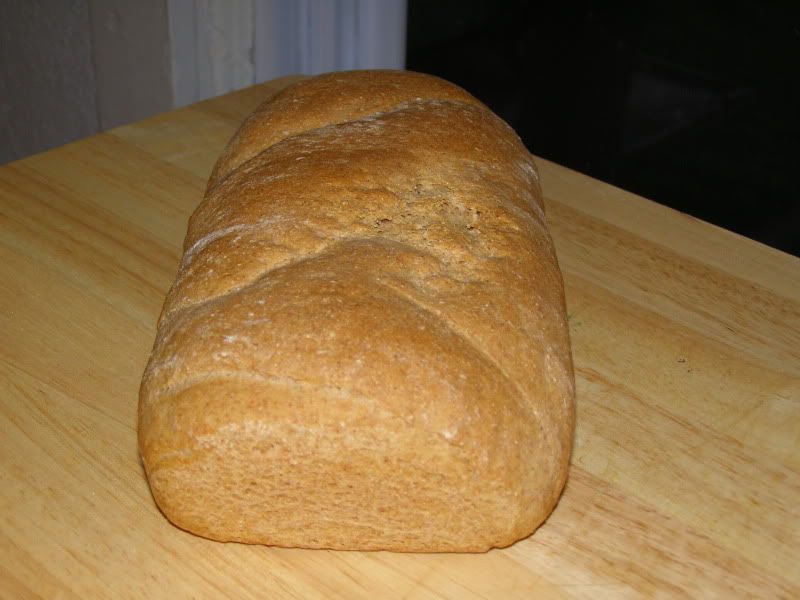
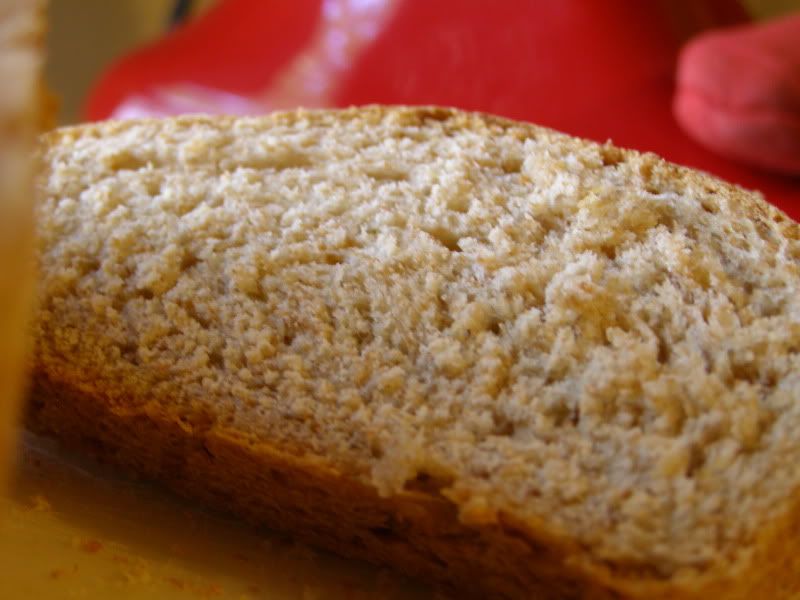
I also did a retake on my Turbinado Wheat Bread, using some lime zest and reducing the sugar. It wasn't fantastic, too tart, but it sure looked pretty!
I love making bread, it's so very therapeutic. Plus I'm not as tempted to eat the batter! When I find a truly fantastic bread recipe I will definitely post it, don't you worry!
They colored pictures, which I hung up by my computer.
They spent all afternoon baking cupcakes and brownies, which they decorated with fresh fruit, frosting and dark chocolate they shaved themselves! Mom and Grandma helped a little, of course!
And shared lots and lots of hugs!
We all went out to dinner that night, the girls, Mom, Dad and Grandma!
The girls spent the night with me, sleeping over in my itty bitty apartment. I forgot how much fun sleepovers were! We ate spaghetti (with my Grandma's delicious sauce), painted our fingernails and toenails (with only minor spillage), and walked to Dairy Queen for some much needed deliciousness!
The next night was spent at my mom's with pizzas on the grill along with spaghetti pie for dinner. The girls also put on a talent show they had been rehearsing for 3 nights!
It was a fantastic surprise brilliantly organized by my Mom, Grandma and Aunt. It was the best birthdays I've had in a long, long time!
I love you guys!
That weekend my mom gave me one of her old bread making books. Since then I've been trying my hand at breads, which is why I haven't been posting too many recipes. I still don't have a recipe today; the rye bread I made that was so delicious was just too crumbly.
Something I need to work on. It toasts up wonderfully, but it's a bit dangerous to grab out of the toaster!
I also did a retake on my Turbinado Wheat Bread, using some lime zest and reducing the sugar. It wasn't fantastic, too tart, but it sure looked pretty!
I love making bread, it's so very therapeutic. Plus I'm not as tempted to eat the batter! When I find a truly fantastic bread recipe I will definitely post it, don't you worry!
Friday, August 6, 2010
Hectic/Crazy/Tasty
I am so sorry for such a long absence. Really I am.
My life's been crazy lately. I don't think I've stopped moving since my birthday! I've had cousins to visit, weddings and benefits to attend... Mom has the pictures from my birthday weekend and I haven't even seen her but once since then. That was on the way to a wedding shower last weekend.
I have been cooking and baking, though. Posts are written out, awaiting pictures AND an internet connection for that matter. Kyle got his drive on on Wednesday and moved in.
Score!
We walked down to the froyo place down the street for dinner last night! I was so distracted I forgot about taking pictures until we were both almost finished.. oops!


My creation of pomegranate/green tea swirl froyo with peanut butter froyo on top and all topped with cookie dough, chocolate chips, walnuts and a dash of blueberries!

Kyle's creation of chocolate/vanilla swirl froyo with what looks like gummy bears, sour gum drops, and maybe granola? ..I didn't actually pay too much attention to what he picked out. I was waaaaaay too excited about the toppings bar... >_>
In other news, Kyle is having AT&T turn on the internet connection in the apartment on Monday! Woot! More posting time!
More to follow next week! After the family reunion on Sunday... I think despite having never trained for one, I really am running a whirlwind life marathon...
My life's been crazy lately. I don't think I've stopped moving since my birthday! I've had cousins to visit, weddings and benefits to attend... Mom has the pictures from my birthday weekend and I haven't even seen her but once since then. That was on the way to a wedding shower last weekend.
I have been cooking and baking, though. Posts are written out, awaiting pictures AND an internet connection for that matter. Kyle got his drive on on Wednesday and moved in.
Score!
We walked down to the froyo place down the street for dinner last night! I was so distracted I forgot about taking pictures until we were both almost finished.. oops!
My creation of pomegranate/green tea swirl froyo with peanut butter froyo on top and all topped with cookie dough, chocolate chips, walnuts and a dash of blueberries!
Kyle's creation of chocolate/vanilla swirl froyo with what looks like gummy bears, sour gum drops, and maybe granola? ..I didn't actually pay too much attention to what he picked out. I was waaaaaay too excited about the toppings bar... >_>
In other news, Kyle is having AT&T turn on the internet connection in the apartment on Monday! Woot! More posting time!
More to follow next week! After the family reunion on Sunday... I think despite having never trained for one, I really am running a whirlwind life marathon...
Tuesday, July 13, 2010
Disappearing Act
**update: I found the pictures! They were still on my camera! Whoops! I added them to the post like I originally had planned!**
So I must be losing it. I've searched through all the pictures in my computer and cannot find the picture I know I took of my delicious smoothie covered in Grape Nuts. Oh well - it might scare some people anyway being so green and all! It was downright delicious and I got the idea from Peas and Thank You. I just concocted my own mixture for the smoothie base (while breaking my blender in the process... come to think of it, I even took a picture of that poor blender in the trashcan... where DID my photos disappear to??)
I also added the Grape Nuts. This kept me full for hours! Oh do I love Grape Nuts. Best invention ever, in my opinion!
Speaking of great inventions, I discovered a new favorite soap! It smells so incredibly good that I was even stopped coming out of Starbucks one morning and asked what I was wearing! Oh yeah, it's that yummy! Feast your eyes on:
THE MAGIC SOAP!!
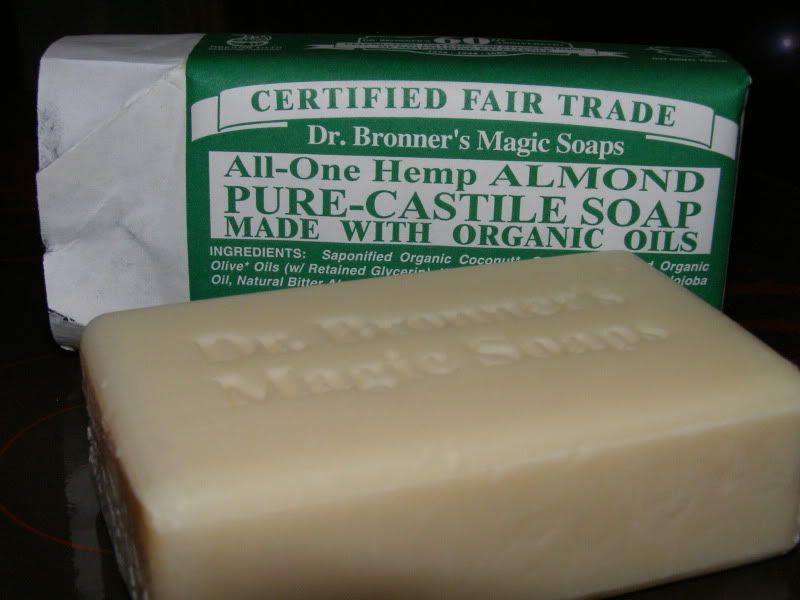
It was even on sale at K3 Natural Foods! Score!
Green Smoothie with Grape Nuts
3/4 - 1 cup frozen spinach, defrosted
1 granny smith apple, chopped
1/4 cup fresh blueberries
1 teaspoon ginger
1/2 cup skim milk
1/2 cup Grape Nuts cereal
In a blender or food processor, combine spinach, apple, blueberries, ginger and milk until smooth. Pour into a bowl and top with Grape Nuts.
So I must be losing it. I've searched through all the pictures in my computer and cannot find the picture I know I took of my delicious smoothie covered in Grape Nuts. Oh well - it might scare some people anyway being so green and all! It was downright delicious and I got the idea from Peas and Thank You. I just concocted my own mixture for the smoothie base (while breaking my blender in the process... come to think of it, I even took a picture of that poor blender in the trashcan... where DID my photos disappear to??)
I also added the Grape Nuts. This kept me full for hours! Oh do I love Grape Nuts. Best invention ever, in my opinion!
Speaking of great inventions, I discovered a new favorite soap! It smells so incredibly good that I was even stopped coming out of Starbucks one morning and asked what I was wearing! Oh yeah, it's that yummy! Feast your eyes on:
THE MAGIC SOAP!!
It was even on sale at K3 Natural Foods! Score!
Green Smoothie with Grape Nuts
3/4 - 1 cup frozen spinach, defrosted
1 granny smith apple, chopped
1/4 cup fresh blueberries
1 teaspoon ginger
1/2 cup skim milk
1/2 cup Grape Nuts cereal
In a blender or food processor, combine spinach, apple, blueberries, ginger and milk until smooth. Pour into a bowl and top with Grape Nuts.
Purple Potato Eater

I said Mr Purple Potato Eater, what's your line?
He said eating purple potatoes, and it sure is fine
But that's not the reason that I came to land
I wanna get a job in a rock 'n roll band
Granted I changed the words around to fit my current purple passion, but I loved that song growing up! As many young girls do, I loved anything purple! It's only fitting that I'd love purple potatoes, too!
I discovered the beauties one afternoon while browsing in Kroger. While I'd heard of them, I'd never been able to partake in their purple wonderment. Until now. I snatched up a couple of those bad boys and hauled my expensive tastes up to the register. The kind woman there rang them up as baking potatoes, saving me $3 a pound in the process! Bless her heart! I was filled with happiness!
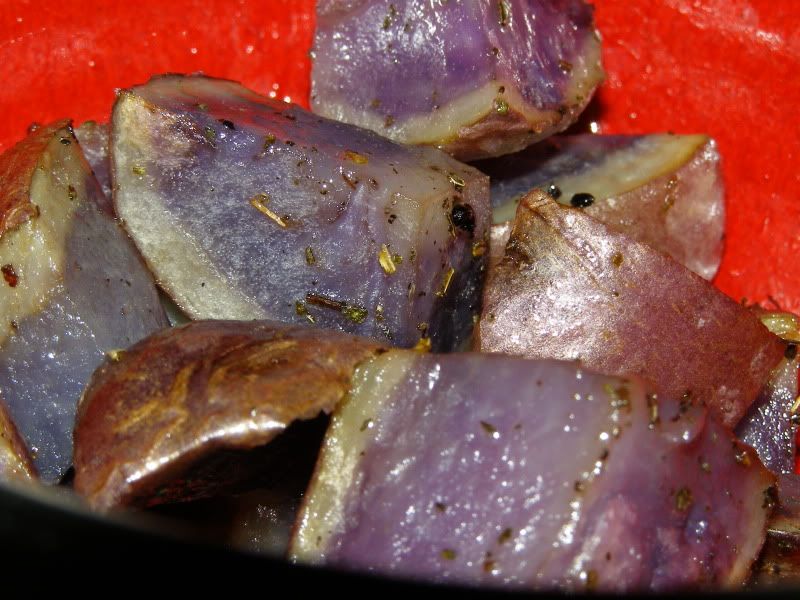
The happiness only grew as I arrived home, chopped up a potato and roasted it to perfection. Maybe they don't taste outrageously different, but they sure are gorgeous!
Roasted Purple Potato
1 purple potato, washed and chopped into large pieces
1 tablespoon olive oil
Pinch of kosher salt
Pinch of black caraway seeds
Pinch of dried sage
Preheat oven to 400 degrees. Line a cast iron skillet with aluminum foil. Toss all ingredients together in a bowl. Transfer potato mixture into skillet and bake 30 minutes or until done to your liking. Enjoy!
Monday, July 12, 2010
Peas Check it Out!
One of my new favorite blogs, Peas and Thank You, is having an awesome cookbook giveaway! You really should check out her blog - her stories are hysterical and fun. She makes being vegan seem so awesome! I'm a "sometimes vegetarian" myself, but that craving for meat I get once in a while makes me a horrible candidate for veganism! Mama Pea is in the midst of making a cookbook - I'm so excited about it I even started to check for it at Barnes and Noble yesterday even though I knew it wasn't finished yet!
So check out her website, there's tons of yummy recipes to tide you over until the cookbook emerges!
So check out her website, there's tons of yummy recipes to tide you over until the cookbook emerges!
Friday, July 9, 2010
Caffienated Goodness
Sorry for the lack of posts lately. It's been so hard to get my butt over to Starbucks or Barnes and Noble for the wi-fi for my computer. Poor lonely little laptop sitting on my bookshelf with wonderous photos just waiting to be uploaded and posted!
*sigh*
Well this morning I decided to make my own coffee. I have some of Target's house blend in my pantry and I like to add odd ingredients to it. This morning's concoction was 2 tablespoons of coffee grounds, a pinch of lavender buds and a light sprinkling of cinnamon brewed in 5 cups of ice cold water. I poured it over some honey to sweeten it, ooooooh was it yummy!
So experiment with your coffee! You may be surprised!
Friday, July 2, 2010
LIMEY! It's Tuna!
So I must take a quick time out from this crazy Friday-before-a-holiday-weekend Bank Day and brag about my lunch. A lunch I was way too excited to eat to take a picture of!
It'll sound pretty strange, I know, but the combination was outright divine!
I dug into my refrigerator this morning and pulled out:
Goat Cheese
Greek Yogurt
Red Grapes
A Lime
I added these luscious ingredients to a plain ol' ordinary can of tuna and POW! I feel just like Emeril!
I ate my yummy tuna salad with my favorite crackers, Kellog's All Bran crackers - original flavor. Yumaliciously refreshing!
If you'd like my exact measurements, they're listed below!
Limey! It's Tuna
1 ounce plain goat cheese
1 tablespoon plain greek yogurt
1/2 cup seedless red grapes, halved
1/2 teaspoon lime zest
1 3-ounce can tuna, rinsed
Mix together all ingredients, making extra sure to blend the goat cheese into the yogurt. Serve with your favorite crackers or on whatever "vehicle" of transport you prefer! Cucumbers, pepper slices, toast or even a spoon!
Turbinado Tornado
Do you ever have those days where the carbohydrate monster consumes you?

It rages and wars until you feed it? Does yours enjoy homemade bread as much as mine does? If it does, then you're in luck!
I've made challah bread before, but I wanted to try making a sandwich-type bread that I could toast without making an gooey mess. Or a crumbly, firey mess for that matter. I went to K3 Foods and picked up some stone ground wheat flour as well as some turbinado sugar, which I'd never used before. Then I turned to my trusty Kitchen Aid manual for some of their bread recipes!
I followed their recipe for Basic White Bread, but substituted in some of my wheat flour. The result was deliciously moist, but dense enough to hold up to slicing and toasting! Perfect with a swipe of almond butter with a morning bowl of Grape-Nuts! Mmmm! Fortunately for me, when sliced and toasted you can't see how lopsided the poor loaf is.
They'll be shaped better with practice! I promise!
Turbinado Wheat Bread
1/4 cup skim milk
1 1/2 tablespoons turbinado sugar
1 teaspoon salt
1 1/2 tablespoons unsalted butter
1 package yeast
3/4 cup warm water (105-115 degrees F)
1 1/2 cups stone ground wheat flour
1 - 1 1/2 cups all purpose flour
Place milk, sugar, salt and butter in a small saucepan. Heat over low heat until butter melts and sugar dissolves. Remove from heat and cool until lukewarm.
In a warmed mixer bowl, dissolve yeast in warm water. Add milk mixture and all of stone ground flour and 1/2 cup of all purpose flour to equal 2 cups. Using dough hook on mixer on lowest setting, mix about one minute. Add remaining flour, 1/2 cup at a time. (I found that I used only that 1/2 cup more of all purpose along with a tablespoon of water - it was pretty dry and I was worried about how well it would mix. It turned out fine this way) Mix until dough clings to hook and cleans the sides of the bowl, roughly 2 minutes. Knead about 2 minutes until dough is smooth and elastic; it will be slightly sticky to the touch. (SLIGHTLY lol)
Remove and place into a lightly oiled bowl, rolling to ensure all of the dough is coated. Cover and allow to rise in a warm place for about an hour or until doubled in size.
Punch down dough and place on a lightly floured surface. I floured the surface with the little bit of millet flour I had left that wasn't enough to make anything out of. Using a rolling pin, roll dough out to about 9 x 14 inches. Starting at the short end, roll the dough tightly. Pinch to seal the seam. Pinch the ends of the roll and fold them under. Place the dough seam side down in a greased loaf pan. Cover and allow to rise again for about an hour or until doubled in bulk.
Preheat the oven to 400 degrees. Bake the loaf about 30 minutes. Remove from pan immediately and cool overnight on a wire rack.
Mmmm... your carb monster will thank you!
Thursday, July 1, 2010
Avocado Corn Chowder
The other day I got the craving to eat something green. I don't know why, I just did. I had an avocado that needed to be eaten before it went bad. Since I had no flour in the house I couldn't make those delicious Mayan Brownies. I decided to indulge my healthier, savory side and make a green soup.
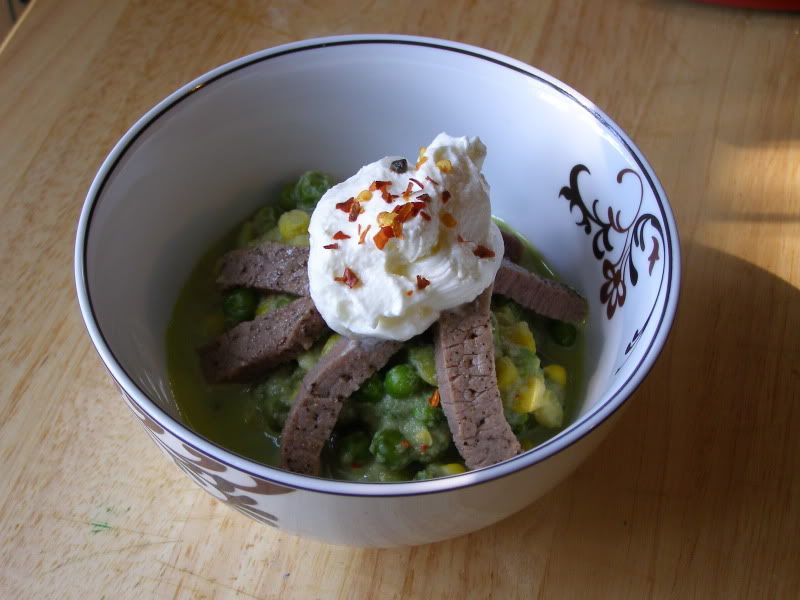
To add some protein to that, I seared up some eye of round. Of course, you don't have to do this. Mmmm eye of round! STEAK!
Avocado Corn Chowder
1 cup frozen peas
1 cup frozen corn
1 cup frozen lima beans
1 cup milk
1 avocado
2 cloves fresh garlic
1/2 cup water
1 teaspoon crushed red pepper flakes
1/2 teaspoon salt
In a food processor, puree milk, avocado, garlic and water until liquidy. Pour avocado mixture, peas, corn and lima beans into a crock pot on high. Stir in pepper flakes and salt. Cook about an hour or until heated through. Serve with a dollop of plain greek yogurt.
Wednesday, June 30, 2010
Red, Brown and Blue! How... American...?
Ever since I was young, my dad would go on the ocassional trip into the Canada. Each time he would bring home Canadian candy. Sometimes it was good, sometimes it was chocolate covered Smarties. (YUCK!) My favorites are these malted candy bars I can never remember the name of. But they're in French and they're in a big pale yellow package! This time he brought me some Canadian Raisinettes! YUM! =)
On a semi-unrelated topic, I just recently started following Peas and Thank You, a really awesome vegan blog! Now, I'm not a vegan but somehow stumbled across her blog while perusing one day and couldn't stop laughing at her stories about her adorable girls. She had hooked me! I signed up to recieve updates.
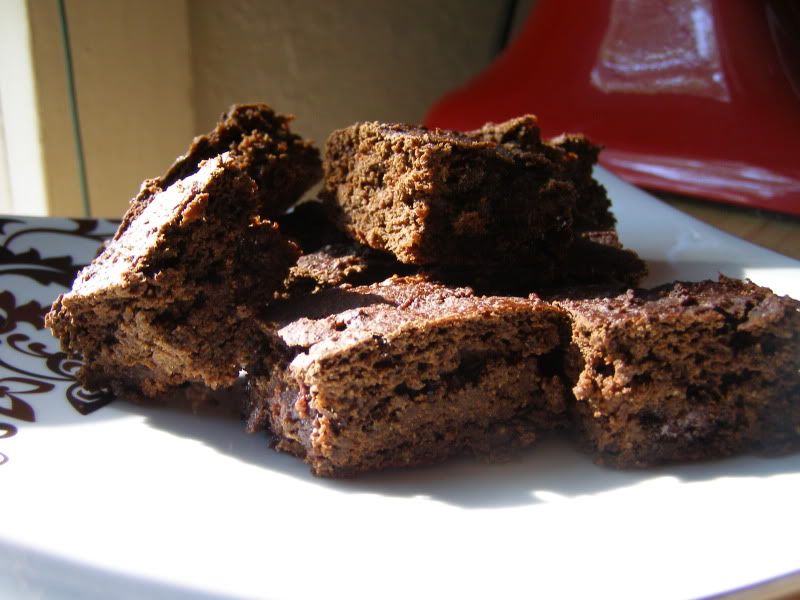
Yesterday morning at 4:30, nature woke me up in that unpleasant way it has gotten into the habit of doing. As I stumbled back to my room and flopped back onto my bed, I checked my email. Hooray, an update from P&TY! It was for vegan brownies. "Mmm... brownies..." I muttered into the pillow. Crap, I don't have applesauce. It's ok, I'll use tomato sauce I thought as I drifted back to sleep.
Fast forward 3 hours. Now fully awake, I still want to make these brownies with tomato sauce. So I did! And with honey instead of sugar, cornmeal for some of the flour, I was a substituting maniac!! And you know what?

They were pretty delicious in my opinion. Addictive even. I ate a whole row out of the pan before lunch. An acquired taste, definitely, but so am I.
Tomato Laden Brownies
3/4 cup all purpose flour
1/4 cup blue cornmeal
1 teaspoon baking powder
1/2 teaspoon baking soda
1/2 teaspoon salt
1 cup canned tomato puree (for more concentrated flavor you could use tomato paste)
1/4 cup honey
1 teaspoon vanilla extract
1/8 cup raisinettes (optional)
Preheat oven to 350 degrees. Grease an 8x8 pan and set aside. In a large bowl, combine flour, cornmeal, baking powder, baking soda and salt. In a separate bowl, mix together tomato, honey and extract. Pour the wet ingredients into the dry ingredients, stirring until just combined, then fold in raisinettes. Pour batter into prepared pan, then bake for 20 minutes or until the sides start the pull away from the pan. Cool and enjoy! Or.. eat hot and enjoy!
Monday, June 28, 2010
Marshmallows
I finally did it! Thanks to Smitten Kitchen, I found a recipe for homemade marshmallows that set up the way it was supposed to, just like her recipe claimed it would!
There's also a special thanks that should go out to my mom. I found some unflavored gelatin packets hidden with the Jello when I rummaged through her cabinets yesterday afternoon. Thanks mom!!
Hehe!
The first time I made marshmallows, I ended up with a new dish - tofumallows.
See? Quite disgusting. Those went in the garbage.
I decided to try the one over at SK. Boy was this a completely different experience! I measured out my sugar and was unfortunately 1/4 cup short. No problem! I'll substitute honey! It's ok, it's ok, this turned out much better than the meringues! I was a little frightened there for a while, though. I decided to multitask and look for a baking dish to butter while the syrup was boiling. Well let me just tell you, that syrup did NOT like being ignored! It promptly erupted all over my stovetop! That'll teach me to use a smaller pot instead of just washing the medium one that was dirty. Well actually, it probably won't. In any case, the marshmallows turned out just fine despite the fact that a third of the syrup was residing on my stove.
These tasted pretty yummy, though I advise you to go easy on the extract if you're using hazelnut. They were a bit overpowering for me!
Springy Fluffy Marshmallows (adapted from Smitten Kitchen and halved)
1 tablespoon plus 1 1/4 teaspoons unflavored gelatin
1/2 cup cold water, divided in half
3/4 cup granulated sugar
1/4 cup honey
1/4 cup corn syrup
1/8 teaspoon salt (which I forgot DOH!)
1 large egg white
2 teaspoons extract (would reduce this the next time)
Mixture of powdered sugar and cocoa powder, for dusting
Oil a baking dish and coat with powdered sugar mixture, making sure to get the corners and sides.
In the bowl of a mixer, sprinkle gelatin over 1/4 cup of the water. Allow to sit while you boil the syrup.
In a medium pot over medium-low heat, cook sugar, honey, corn syrup, remaining 1/4 cup of water and salt, stirring until all the sugar is dissolved. Once the sugar is dissolved, increase the heat to moderate and boil without stirring for roughly 12 minutes or until a candy thermometer reads 240 degrees. Remove the pot from the heat and pour the syrup over the gelatin, stirring until dissolved. On high speed, beat the mixture until tripled in size and fluffy, about 6-10 minutes.
In a separate bowl with clean beaters, beat egg white until stiff peaks form (whoops I only did soft peaks). Beat egg whites and extract into the fluff until just combined. Scrape the mixture into the oiled baking dish and sprinkle powdered sugar mixture over the top. Refrigerate uncovered overnight. Cut with a pizza cutter and toss in powdered sugar mixture.
A word of advice - don't bring them to your un-airconditioned work and fail to keep them in the fridge. They get all sweaty!
Wednesday, June 23, 2010
Cajun Snickerdoodles
Last week I brushed up on my Cajun cooking. I made blackened snickerdoodles! So deliciously black, crunchy and chalky!
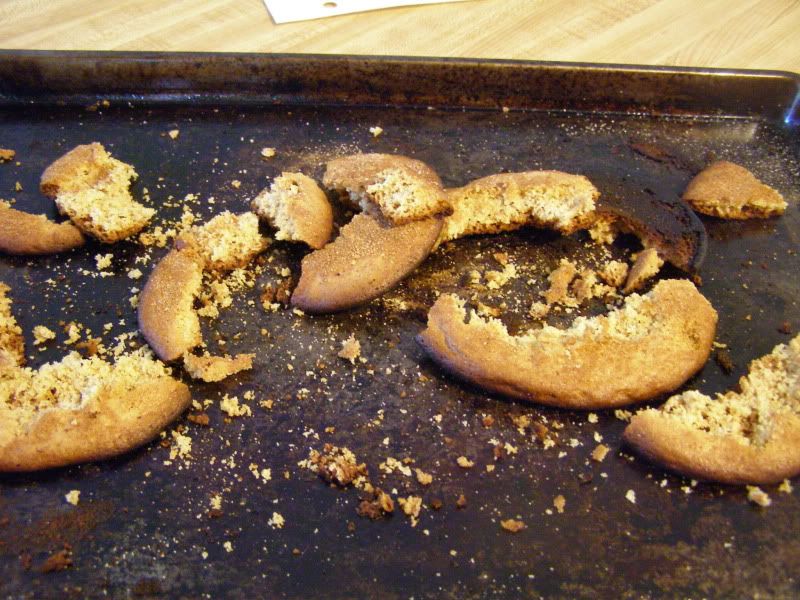
*sob*
Rookie mistake.. I used Pam non-stick cooking spray to coat the cookie sheet in leiu of butter. Bangs head against keyboard in shame.
Kyle, bless him, still ate them.
We attacked the cookies, picking them apart to unearth what was edible. Those parts were pretty tasty at least! And three whole cookies were saved from the same toasty fate as their siblings!
I'll attempt these delicious treats again soon, this time not using honey and using BUTTER to coat the cookie sheet!
Tuesday, June 22, 2010
Chicken "Non" Marsala
I'm back from my relaxing South Carolina vacation. Sad. It was so nice and sunny and beautiful there. The creepy crawlies definitely enjoyed my stay. *scratch* I don't miss them, though.
Even though I was on vacation, I still managed to do some inventing in the kitchen!
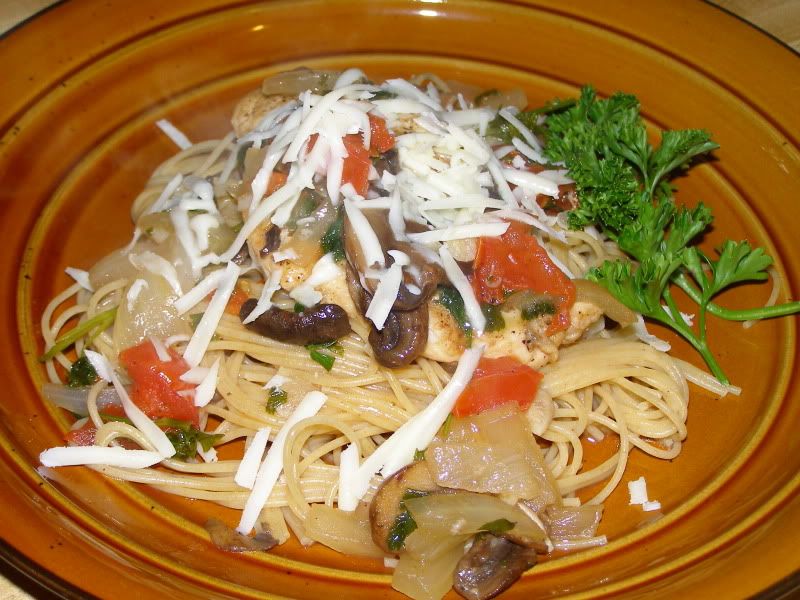
I know what you're thinking... what did I do on a Sunday evening when I got the itch to make Chicken Marsala, but was in a state where they don't sell liquor on Sundays? I substituted like crazy, that's what!
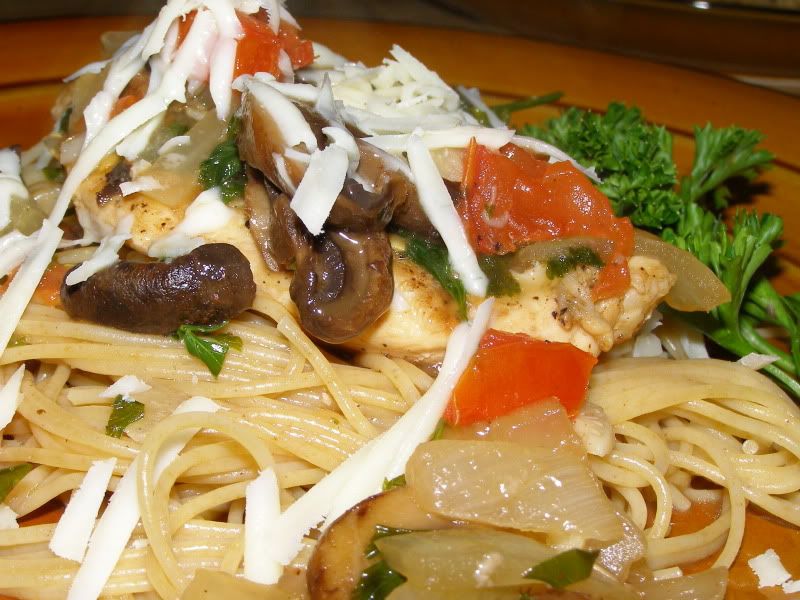
Now this was a challenge to me. To start with, I'd never made chicken marsala before, plus I was trying to substitute the ingredient the dish is named for. Using my "foodie senses" (those are similar to spidey senses, by the way), I picked out a few ingredients that would make the dish my own, but still keep the main components of the original.
I added in roasted plum tomatoes with some olive oil, salt and pepper... those were pretty yummy. They were dangerously close to not even making it into the pan..
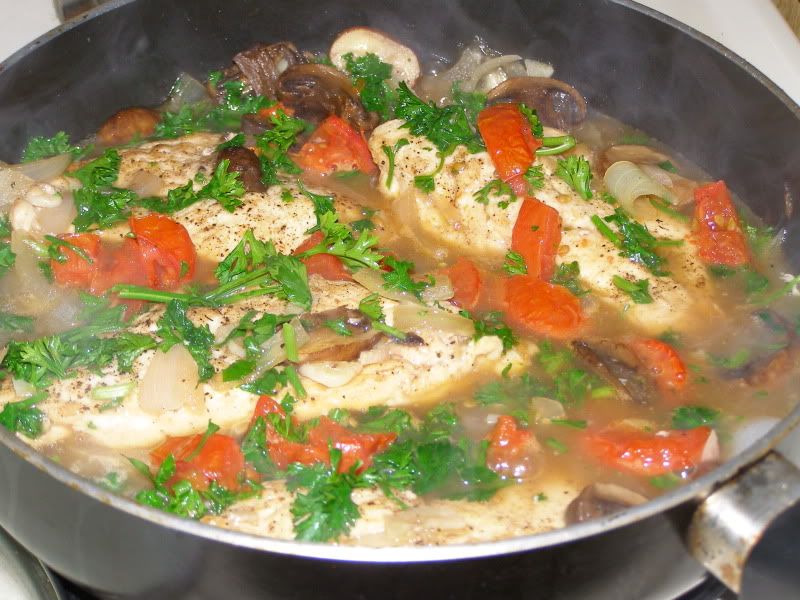
Kyle thought the dish was a hit! Perhaps it could have used a bit more salt.. hehe!
Chicken "Non" Marsala
8 baby bella mushrooms, sliced
1/2 sweet onion, sliced
2 large cloves garlic, diced
1/2 tablespoon butter
1 tablespoon olive oil
4 skinless chicken breasts, patted dry and seasoned with salt and pepper
Juice of 1/2 a lemon
1/2 cup white grape juice
1/2 cup water
1 tablespoon red wine vinegar
3 plum tomatoes, roasted and diced
1/3 cup fresh parsley, roughly chopped
Mix lemon juice, grape juice, water and vinegar in a bowl and set aside. Over medium heat, melt the butter in a large skillet. Add mushrooms and onion and saute until the onion just starts to turn clear. Add garlic and sautee another 30 seconds. Remove veggies and set aside. Add olive oil to the pan and turn the heat up to medium high. When oil is hot, add chicken breasts and sear about 3-5 minutes on each side or until a nice crust forms. Add juice mixture to pan, followed by the veggies. Cover and simmer about 10-15 minutes over medium heat. Add parsley and tomatoes, return the lid and simmer another 5 minutes. If you need to, you can thicken with cornstarch. Serve over pasta and topped with grated asiago cheese!
Even though I was on vacation, I still managed to do some inventing in the kitchen!
I know what you're thinking... what did I do on a Sunday evening when I got the itch to make Chicken Marsala, but was in a state where they don't sell liquor on Sundays? I substituted like crazy, that's what!
Now this was a challenge to me. To start with, I'd never made chicken marsala before, plus I was trying to substitute the ingredient the dish is named for. Using my "foodie senses" (those are similar to spidey senses, by the way), I picked out a few ingredients that would make the dish my own, but still keep the main components of the original.
I added in roasted plum tomatoes with some olive oil, salt and pepper... those were pretty yummy. They were dangerously close to not even making it into the pan..
Kyle thought the dish was a hit! Perhaps it could have used a bit more salt.. hehe!
Chicken "Non" Marsala
8 baby bella mushrooms, sliced
1/2 sweet onion, sliced
2 large cloves garlic, diced
1/2 tablespoon butter
1 tablespoon olive oil
4 skinless chicken breasts, patted dry and seasoned with salt and pepper
Juice of 1/2 a lemon
1/2 cup white grape juice
1/2 cup water
1 tablespoon red wine vinegar
3 plum tomatoes, roasted and diced
1/3 cup fresh parsley, roughly chopped
Mix lemon juice, grape juice, water and vinegar in a bowl and set aside. Over medium heat, melt the butter in a large skillet. Add mushrooms and onion and saute until the onion just starts to turn clear. Add garlic and sautee another 30 seconds. Remove veggies and set aside. Add olive oil to the pan and turn the heat up to medium high. When oil is hot, add chicken breasts and sear about 3-5 minutes on each side or until a nice crust forms. Add juice mixture to pan, followed by the veggies. Cover and simmer about 10-15 minutes over medium heat. Add parsley and tomatoes, return the lid and simmer another 5 minutes. If you need to, you can thicken with cornstarch. Serve over pasta and topped with grated asiago cheese!
Thursday, June 10, 2010
Go Hawks!!
Who watched that amazing game last night? It was packed full of action and adrenaline.. I was literally on the edge of my seat the whole game. 49 years is a long time to wait, but man this team deserved it!
I can just hear my uncle shouting and laughing and cheering like mad. He would have been so proud!
Chicago Blackhawks win the Stanley Cup, June 9, 2010 - Uncle Jeff, this one's for you!

I can just hear my uncle shouting and laughing and cheering like mad. He would have been so proud!
Chicago Blackhawks win the Stanley Cup, June 9, 2010 - Uncle Jeff, this one's for you!
Tuesday, June 8, 2010
Whip it Gewd!
I’ve been waiting for three months. It finally happened today! Christina Aguilera’s new CD was released! I rushed out to buy it… see…

I love it! Totally worth the wait!
What’s the best way to listen to a new CD? Cranking it in the house while whipping up something yummy!
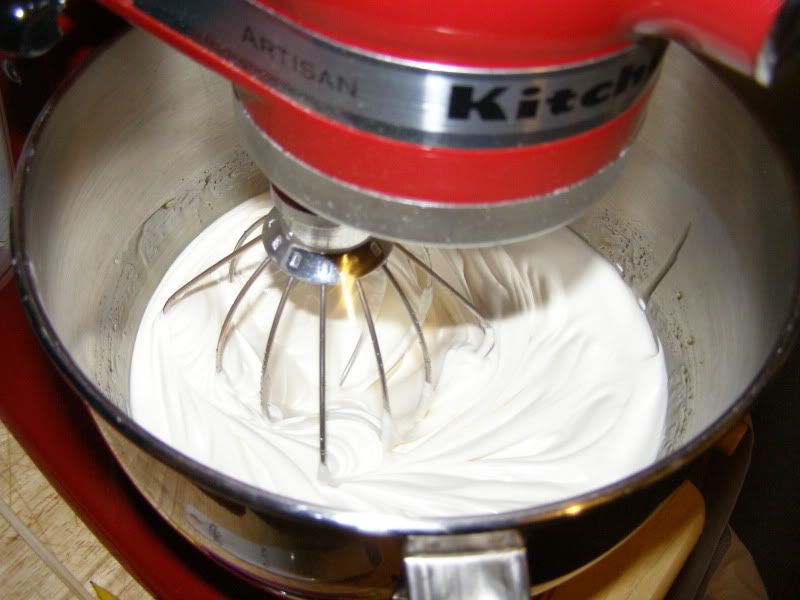
Now, I’ve been whipping up lots of calorie-laden treats lately, so I decided to switch it up and try some meringue cookies. I realized I’d never actually eaten one, let alone baked one. Up for the challenge, I altered a recipe to use honey instead of granulated sugar.
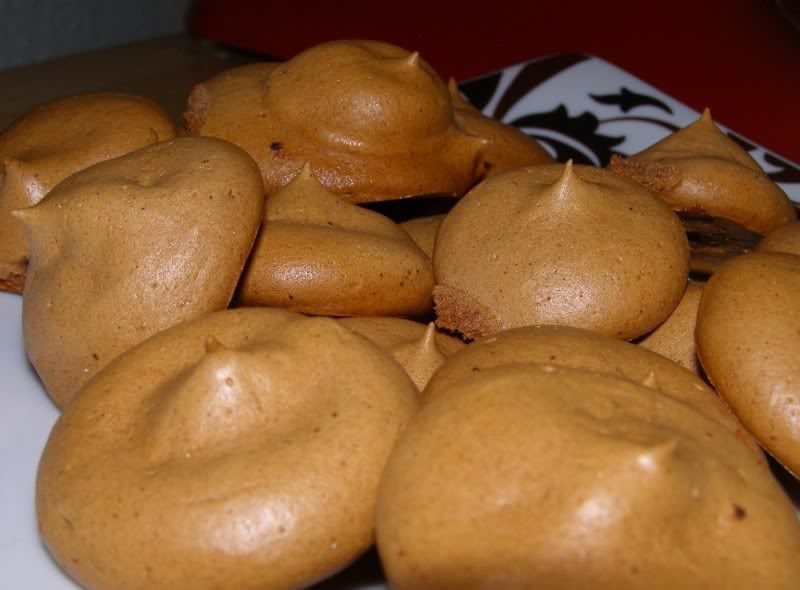
Now, some came out slightly burnt, some came out a bit sticky, (I need a grown-up oven that cooks evenly...) so they need a bit of work. Let me know if you've got any opinions! I was thinking next time I'd try using some more CoT or even make them with granulated sugar the way they're supposed to be!
I love it! Totally worth the wait!
What’s the best way to listen to a new CD? Cranking it in the house while whipping up something yummy!
Now, I’ve been whipping up lots of calorie-laden treats lately, so I decided to switch it up and try some meringue cookies. I realized I’d never actually eaten one, let alone baked one. Up for the challenge, I altered a recipe to use honey instead of granulated sugar.
Now, some came out slightly burnt, some came out a bit sticky, (I need a grown-up oven that cooks evenly...) so they need a bit of work. Let me know if you've got any opinions! I was thinking next time I'd try using some more CoT or even make them with granulated sugar the way they're supposed to be!
Saturday, June 5, 2010
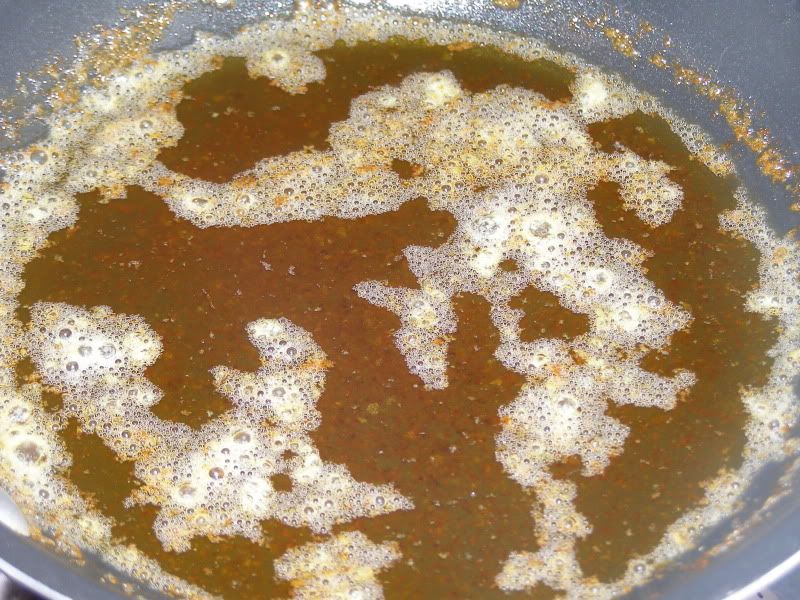
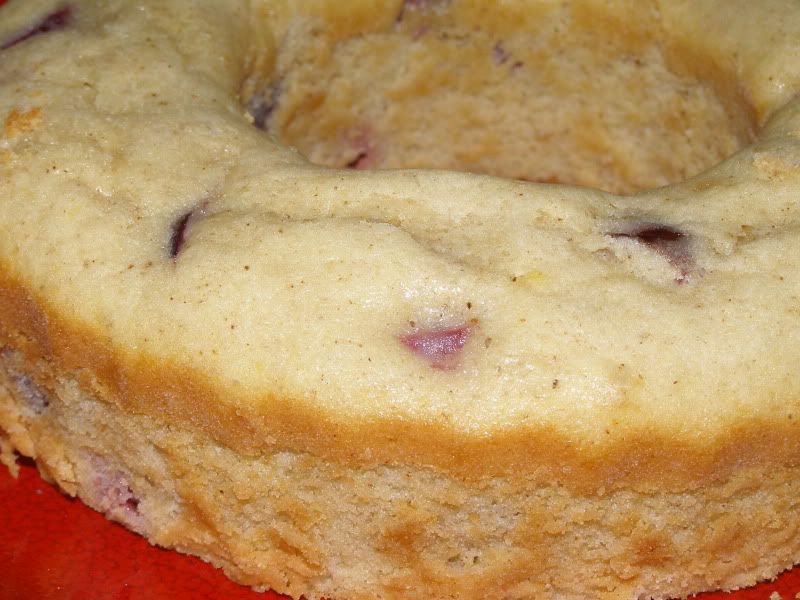
Brown Butter Cake with Cherries
This sly cake started out disguised as a white cake but morphed itself into the beautiful brown butter cake with cherries you see before you!
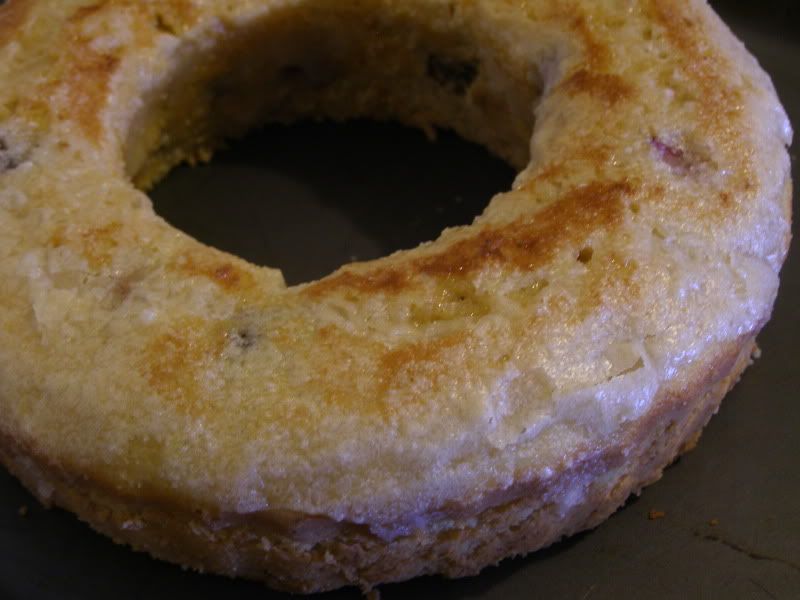
Can you smell it? Don’t worry, I won’t tell anyone if you bang your nose into the screen trying!
I’ve always been wary of using a recipe with browned butter. What if I happened to burn it instead of brown it? It’s such a fine line to walk. I believe I was successful, though. What do you think?
My initial idea was to frost the cake to give it a little something extra since it looked like this before...
Pretty but lacking, no? Well only after I made the "frosting" with granulated sugar did I realize it had all the texture of sandpaper. It overpowered the cake. So I scraped it off. Unfortunately I couldn't get all of it off! Disaster! I was ready to cry. Now, wait.. I'll stick it under the broiler to caramelize the sugar!
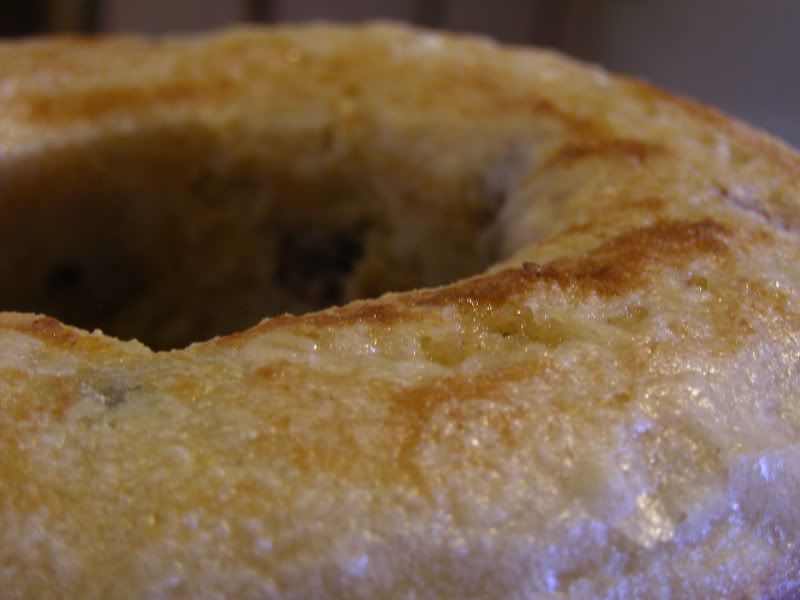
Now that is perfection!
Brown Butter Cake with Cherries
1/2 cup sugar
1/4 cup unsalted butter, browned
1 egg
1 cup all purpose flour
1/8 teaspoon salt
1 teaspoon baking powder
1/2 cup skim milk
3/4 teaspoon almond extract
1/2 cup cherries, pitted and diced, then dusted with flour
Preheat oven to 350 degrees. Brown butter and allow to cool. In mixer bowl, beat egg and sugar until very well mixed. Add cooled butter, mixing until a pasty consistency is reached.
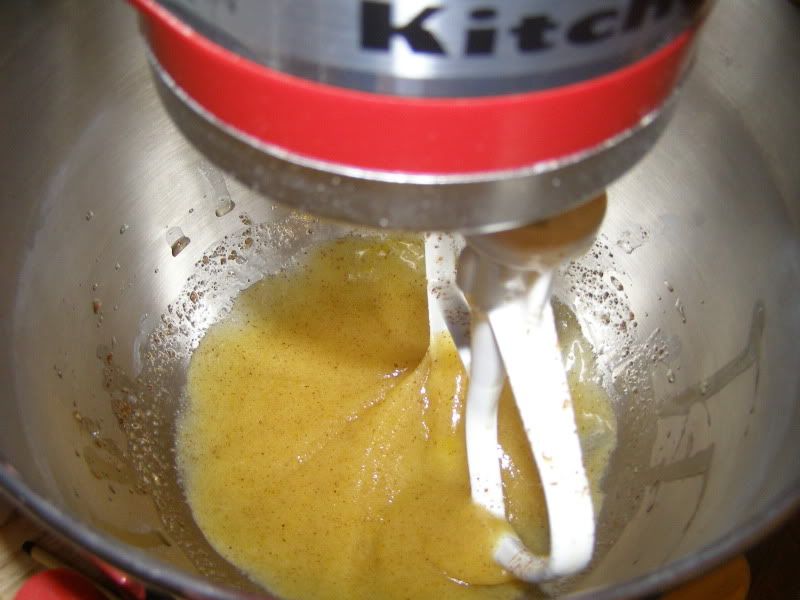
In a separate bowl, combine flour, salt and baking powder. In yet another bowl, combine milk and almond extract. Alternating flour mixture and milk mixture, add to paste mixture and beat well. Stop mixer, scrape down the sides and add cherries, mixing just enough to incorporate. Pour into a well buttered and floured bundt pan. Bake 30 minutes or until cake springs back when lightly touched. Cool completely before removing from pan.
Can you smell it? Don’t worry, I won’t tell anyone if you bang your nose into the screen trying!
I’ve always been wary of using a recipe with browned butter. What if I happened to burn it instead of brown it? It’s such a fine line to walk. I believe I was successful, though. What do you think?
My initial idea was to frost the cake to give it a little something extra since it looked like this before...
Pretty but lacking, no? Well only after I made the "frosting" with granulated sugar did I realize it had all the texture of sandpaper. It overpowered the cake. So I scraped it off. Unfortunately I couldn't get all of it off! Disaster! I was ready to cry. Now, wait.. I'll stick it under the broiler to caramelize the sugar!
Now that is perfection!
Brown Butter Cake with Cherries
1/2 cup sugar
1/4 cup unsalted butter, browned
1 egg
1 cup all purpose flour
1/8 teaspoon salt
1 teaspoon baking powder
1/2 cup skim milk
3/4 teaspoon almond extract
1/2 cup cherries, pitted and diced, then dusted with flour
Preheat oven to 350 degrees. Brown butter and allow to cool. In mixer bowl, beat egg and sugar until very well mixed. Add cooled butter, mixing until a pasty consistency is reached.
In a separate bowl, combine flour, salt and baking powder. In yet another bowl, combine milk and almond extract. Alternating flour mixture and milk mixture, add to paste mixture and beat well. Stop mixer, scrape down the sides and add cherries, mixing just enough to incorporate. Pour into a well buttered and floured bundt pan. Bake 30 minutes or until cake springs back when lightly touched. Cool completely before removing from pan.
Subscribe to:
Posts (Atom)